invitation2xhtml.xslt - Transforming XML to XHTML
Up ·
XHTML ·
PDF ·
WordML
The input XML document is designed to be very simply. Since XHTML is simple
too, it's not difficult to write an XSLT program to transform the XML. Before I describe
the program you might want to try it. Everything you need is an XSLT engine, such as Xalan
or Saxon. Then follow steps 1-3:
Download the sample XML file invitation.xml
Download the XSLT program invitation2xhtml.xslt
(Download/View)
Run the XSLT program on the sample data, for example:
xalan.sh -IN ../invitation.xml -XSL invitation2xhtml.xslt -OUT invitation.html
You should get an XHTML file as the result of the transformation
(invitation.html). Of course you can view
it in your web browser. For those
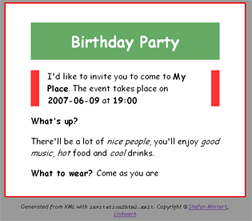
of you who don't have a web browser ;-) there's a screenshot of how it looks
in mine:

If you downloaded the XSLT program, take a look at it. Besides of the root element stylesheet
it contains just some templates for the element types of the sample XML data:
The Template for the root element invitation
generates the global XHTML structure (html, head, body).
Within the body it generates some text output and applies the templates for
the other input elements at the appropriate points.
<xslt:template match="invitation">
<html>
<head>
<style type="text/css">
...
</style>
</head>
<body>
<div class="body">
<p class="meta">I'd like to invite you to
come to
.
The event takes place on
at
</div>
</address>
</body>
</html>
</xslt:template>
The template for event
s is simple: event
s become h1 elements (heading 1):
The next template matches several elements: location
, date
and time
. All these
elements become inline elements in XHTML, marked up as span
. To control the XHTML/CSS styling
of those elements separately for each element type, I use the class attribute with a value of the original
element type name. The local-name()
function returns the element type name.
<xslt:template match="location | date | time">
<span class="{local-name()}"></span>
</xslt:template>
para
and emph
are handled straight forward: They're getting transformed to p
and em
respectively:
dresscode
and description
are not much more difficult to process:
Both are prefixed by an appropriate text:
<xslt:template match="description">
<div class="description">
<strong>What's up?
</strong>
</xslt:template>
<xslt:template match="dresscode">
<p class="dresscode">
<strong>What to wear?
</strong>
</xslt:template>
© 2005, Stefan Mintert, All rights reserved


